5.3.2 Quality-check raster file - LUPMISManual
Main menu:
5.3.2 Quality-check Raster File
Level of expertise required for this Chapter: Intermediate; specifically for LUPMIS @ TCPD
If you receive raster maps from other sources, you should check them, before you add them to LUPMIS for land use planning, for:
Geographical accuracy
File size and format
Rectangular shape
Content and age
- - - - -
A) For geographical accuracy:
The best way is to overlay the raster image with a vector layer, which has been assessed as accurate before, preferably with a GPS-tracked road layer.
In the example below, an aerial photo has been overlaid with the magenta line of a tracked road. It can be clearly seen, that the road-tracking fits nicely to the road display of the image.
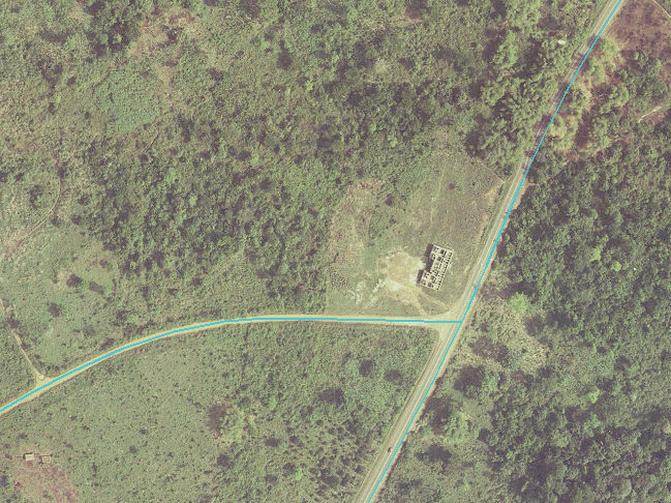
Consider the accepted error tolerance, for land use planning at TCPD with LUPMIS approximately 5 m.
- - - - -
B) For rectangular shape:
If the images are not in a grid format (see below), you have to mosaic and clip them:
1. Create a mask for each image. A mask is the area of the raster image, which is to be used for processing (and display): Display the image with all adjacent images. Then, draw a polygon of the area (mask area) in live layer, and save it to a file name, such as Mask_imagefile, or similar.
- - - - -
2. Mosaic and clip: Main menu > Utilities > Bitmap utilities > Mosaic & clip > Mosaic and clip calibrated bitmaps window: Add file with mask > Select image file: Format > File name > Select file name of mask file > … and repeat for all images … > Min X: Enter the western frame > Min Y: Enter the northern frame > Max X: Enter the eastern frame > Max Y: Enter the northern frame > OK > Save as: File format: JPG > Specify file name

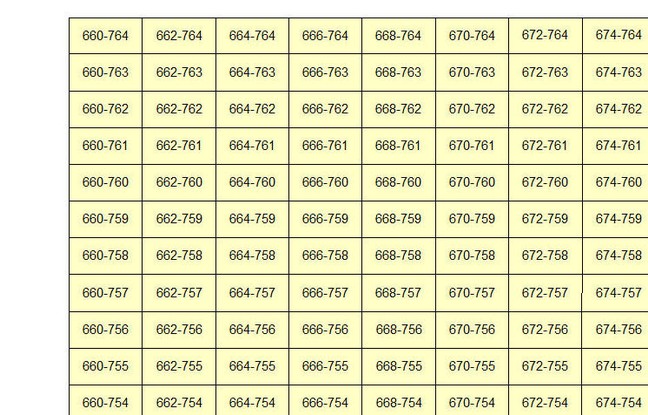
You should have an index map (see sample below).
- - - - -
C) For file size and format:
Most images are grouped in tiles of either 1 x 1 km or 2 x 1 km (see index above with tiles of 2x1 km).
A pixel number of approximately 2500 per km is sufficient at LUPMIS, which is a size of 5000 x 2500 pixels for a 2 x 1 km image (with a pixel size of 40 cm). You can view the image size by moving the mouse to the file name in Windows Explorer, or in Paint Shop (Main menu > Image > Image Information).
If the pixel size is larger, you better reduce it in Map Maker: Main menu > Utilities > Bitmap utilities > Reduce size > Select folder and file > Open > Transform file window: Write to a new file > Specify new file name > Save > OK > Enter multiplication factor window: Factor of 0.5 will reduce the pixel size to half > OK.
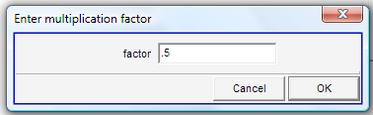
For example, if the original image has a size of 10,000 x 5,000, you reduce it by a factor of 0.5 (half) to have a size of 5,000 x 2,500. If it has 20,000 x 10,000, you reduce it by 0.25 to the size of 5,000 x 2,500. This will enlarge the size of the pixels: The factor of 0.5 will make the pixel twice as big, factor of 0.25 makes the pixel 4times as big. You can always see the size of a pixel by zooming extremely (!) in to the raster and measure the distance with the Tape-tool from the toolbar left.
See also part B of Chapter 5.3.1 and Chapter 5.3.3 for similar descriptions.
- - - - -
Note 1: If it is not rectified, you can do it also in Paint Shop Pro (Main menu > Image > Resize).
Note 2: If the pixel size is considerably smaller, look at the image to see, if you can recognize sufficient details. You might also have to reject the image from the supplier.
Note 3: JPG files are considerably smaller and faster to load then TIF files. You better convert TIF images to JPG format by: Main menu > Utilities > Convert file format > from TIF > Select folder and file > Open > Choose file type: JPG > Specify new file name > Save > Select calibration option window: Map Maker calibration > OK
Note 4: If you have an image in PNG format, use Paint Shop Pro to convert (Open > Save as…) unreferenced.
Note 5: Have a last look at the file size of the JPG file. If it is larger than 3000 KB, loading in Map Maker will be slow. For example, for a 1:50,000 scanned topo sheet (25 x 25 km till 30 x 30 km), a resolution of 4000 x 4000 or upto 6000 x 6000 is sufficient. If it is larger, use the Reduce size operation, as explained above.
Note 6: Both of these processes are very resource-intensive. If the original file was larger than 50 MB, you better to close Map Maker after the process, and restart again (see also Annex 4).
- - - - -
D) For content and age:
Have a look, if the image matches your expectations: Is the quality good enough (resolution, colors)? Does it show sufficient details (resolution, contrast)? How old is it (in dynamic areas it should be less than 3 years old, in more ‘static’ areas 5 upto even 10 years are ok).