A12. Garmin GPS - LUPMISManual
Main menu:
Annex 12: Garmin GPS
Level of expertise required for this Chapter: Intermediate; general GIS training
A12.1 Initial Set-Up of Garmin 62
The Garmin GPS has to be initially set up to work in UTM, meters etc. Follow the pictured instructions below. (The description for set-up of Garmin 76 is described in the following Chapters below).
Navigate with the Menu button to the main menu (below) and then to 'System' and to 'Units':
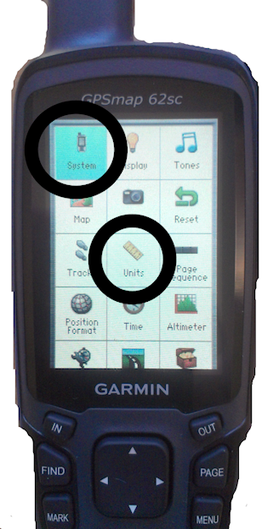
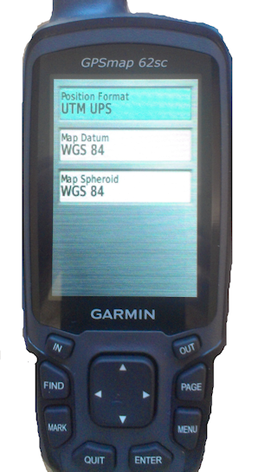
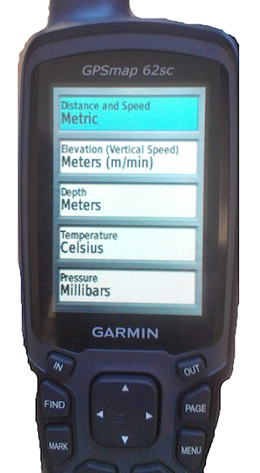
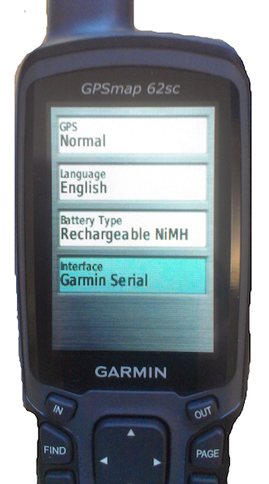
In each of the menus, select the option as shown below:
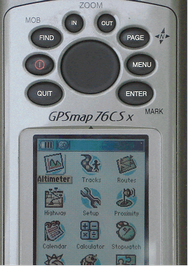
A12.2 Initial Set-Up of Garmin 76
1. After switching on with the red On button, press the PAGE button till you get to the ‘Main Menu’ screen.
2. Navigate with the big round button to ‘Tracks’ and ENTER
3. On the ‘Tracks’ screen:
- 3.1 ‘On’ should be ticked
(If not, navigate to ‘On’ and ENTER)
- 3.2 Navigate to ‘Setup’ and ENTER
4. On the ‘Track Log Setup’ screen:
- 4.1 ‘Wrap When Full’ should be ticked
(If not, navigate to it and ENTER)
- 4.2 Navigate to ‘Record Method’ and ENTER
- 4.3 Select ‘Distance’ and ENTER
- 4.4 Navigate to ‘Interval’ and ENTER.
- 4.5 Enter 0, ENTER, 0, ENTER, 1, ENTER, then OK, ENTER (which means 0.01 km)
- 4.6 Naviage to 'Colour' and choose any colour, but not transparent and ENTER
- 4.7 Navigate to ‘Data Card Setup’ and ENTER
- 4.8 On the ‘Track Log Data Card ’ screen:
- 4.9 Be sure, that ‘Log Track on Data Card’ is not ticked
- 4.10 QUIT – QUIT – QUIT
5. Back to the ‘Main Menu’ screen, navigate to ‘Setup’ and ENTER
6. On ‘Setup Menu’ screen, navigate to ‘System’ and ENTER
7. On the ‘System Setup’ screen:
- 7.1 ‘GPS’ should read ‘Normal’, and QUIT
8. Back to the ‘Setup Menu’ screen, navigate to ‘Units’ and ENTER
9. On the ‘Units Setup’ screen:
- 9.1 ‘Position Format’ should read ‘UTM UPS’
(If not, navigate to ‘Position Format’ and ENTER, then select ‘UTM UPS’ and ENTER)
- 9.2 ‘Map Datum’ should read ‘WGS 84’
(If not, navigate to ‘Map Datum’ and ENTER, then select ‘WGS 84’ and ENTER)
- 9.3 ‘Distance/Speed’ should read ‘Metric’
(If not, navigate to ‘Distance/Speed’ and ENTER, then select ‘Metric’ and ENTER)
- 9.4 ‘Elevation’ should read ‘Meters’
(If not, navigate to ‘Elevation’ and ENTER, then select ‘Meters’ and ENTER)
- 9.5 ‘Depth’ should read ‘Meters’
(If not, navigate to ‘Depth’ and ENTER, then select ‘Meters’ and ENTER)
- 9.6 ‘Temperature’ should read ‘Celsius’
(If not, navigate to ‘Temperature’ and ENTER, then select ‘Celsius’ and ENTER)
- 9.7 ‘Pressure’ should read ‘Millibar’
(If not, navigate to ‘Pressure’ and ENTER, then select ‘Millibar’ and ENTER)
10. QUIT brings you back to the ‘Setup Menu’
- 10.1 Navigate to ‘Time’ and ENTER
11. On the ‘Time Setup’ screen:
- 11.1 ‘Time Format’ should read ’12 Hours’
(If not, navigate to ‘Time Format’ and ENTER, then select ‘12 Hours’ and ENTER)
- 11.2 ‘Time Zone’ should read ’London’
(If not, navigate to ‘Time Zone’ and ENTER, then select ‘London’ and ENTER)
- 11.3 ‘UTC Offset’ should read ’+00 00’
- 11.4 ‘Daylight Saving Time’ should read ’No’
(If not, navigate to ‘Daylight Saving Time’ and ENTER, then select ‘No’ and ENTER)
12. QUIT brings you back to the ‘Setup Menu’
- 12.1 Navigate to ‘Interface’ and ENTER.
13. On the ‘Interface Setup’ screen:
- 13.1 'Serial Data Format' should read 'Garmin'
14. QUIT brings you back to the ‘Setup Menu’
- 14.1 Navigate to ‘Map’ and ENTER.
15. On the ‘Map Setup - General’ screen:
- 15.1 'Orientation' should read 'North Up'
- 15.2 'Lock On Road' should read 'Off'
16. QUIT brings you back to the ‘Setup Menu’
- 16.1 Navigate to ‘Welcome’ and ENTER.
17. On the ‘Welcome Setup’ screen:
- 17.1 Enter LUPM-number. When finished, OK and ENTER.
18. QUIT – QUIT
A12.3 Set Waypoints on Garmin 76
1. Once you are at the point, where you want to set the location of the waypoint, press ENTER for a couple of seconds.
2. The ‘Mark Waypoint’ screen will appear.
3. It is recommended to change the name (top line): Navigate to the top line and ENTER. You now have a keyboard type entry. When finished, QUIT from here.
4. Navigate to ‘OK’ and ENTER.
A12.4 Clear Waypoints on Garmin 76
1. PAGE till you get to the ‘Trip Computer’ screen
2. Press MENU
- 2.1 Navigate to ‘Reset…’ and ENTER
- 2.2 Tick only ‘Delete All Waypoints’ by navigating and pressing ENTER
- 2.3 At the end, navigate to ‘Apply’ and ENTER
3. QUIT
- - - - -
See also:
Part A of Chapter 5.1.6 for tracking with GPS
- Chapter 5.1.7 for transfer of tracks and points from GPS
- Annex 1.3 for installation of Garmin driver