6.6.1 General print procedure - LUPMISManual
Main menu:
6.6 Final Print
With LUPMIS Printing Tools installed, it is strongly advised to use the Printing Tools for printing of any maps for land use planning (see Chapter 8.3).
6.6.1 General Print Procedure
Level of expertise required for this Chapter: Intermediate; specifically for LUPMIS @ TCPD
The general procedure to for a map to be printed is as follows:
1. Load all individual layers, which should appear on the map, such as land use, roads, infrastructure, orthophotomaps, planning layers etc (right-mouse > Project manager > Project manager window: Add layer >>)
Note 1: The selection of the individual layers with their ranking and definition of styles can be a time-consuming process.
2. Select – or define – the style for each layer (see Chapter 6.2)
Note 2: When you save a 'project', you automatically save the styles (mapping units) of the 'project' (see Chapter 1.6). You can use these style definitions, if you have similar maps, such as planning option A map, planning option B map, etc, which should have the same defined colours and symbols. You can load a previously generated style file by: Project manager window: Project style set > Style management > Edit set > Import style set and overwrite > Choose style set window: Browse > Choose folder and file > Open
Note 3: It can be of advantage to have the styles (mapping units) of all units in the style library of the project. It makes it easier to define the legend. See Chapter 6.4.1 for more explanations.
3. Define the legend (see Chapter 6.4)
4. Define the project name as the map title (right-mouse > Project manager > Project manager window: Project information > Description > Title > Enter map title > OK)
5. Define the essential marginalia (‘map furniture’):
LUPMIS remark (right-mouse > Map furniture > Drag to define area at right bottom of screen > Map furniture window: Furniture type > Rich text panel > Type: LUPMIS @ TCPD > Select the text and mark it green, right-aligned, bold and with following size: For A4: 16 - A3: 20 - A2: 24 - A1/A0: 30 > Enlarge the L > OK (See end of Chapter 6.3.1)
TCPD logo (right-mouse > Map furniture > Drag to define area at left top of screen > Map furniture window: Furniture type > Bitmap file (bmp) > Select TCPD_logo.bmp, which should be in folder C:\LUPMIS > Open > OK)(see end of Chapter 6.3.1)
North arrow (see Chapter 6.3.1)
Scale bar (automatically with the 'Automatic' option for standard working maps, see following Chapter 6.6.2
6. Optionally, define additional marginalia:
Legend (see Chapter 6.4.2)
- Location map (see Chapter 6.3.3)
- etc.
7. Optionally, select the template around the map (map template, see Chapter 6.5)
8. Save frequently your settings in a 'project' (see Chapter 1.6)
9. Print (see following chapters 6.6.2 for standard working maps, 6.6.3 for formal planning maps, 6.6.4 for other maps).
Item |
If inside map |
If on panel next to map |
Title |
Top |
1. (top) |
TCPD logo |
Bottom left |
2. |
Legend |
Bottom left |
3. |
Location map |
Top left |
Inside map |
Signature box and explanations |
- |
4. |
LUPMIS remark |
Bottom right |
5. |
- - - - -
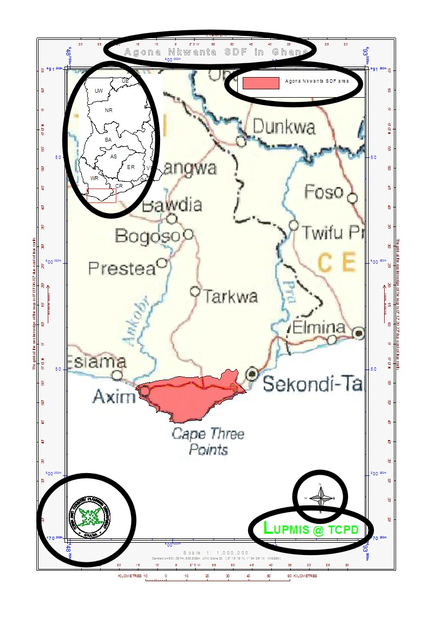
A) It is recommended to use the layout of a standard working map ( Chapter 6.6.2). The marginalia should look like below:
- - - - -
B) If you want some or all of these features not to be displayed on the main map, but outside the map frame, you can select the option of an external 'panel' and enter the panel editor, as shown below:
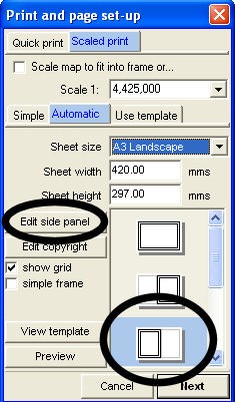
Note: If the requested panel does not show, select a different sheet size.
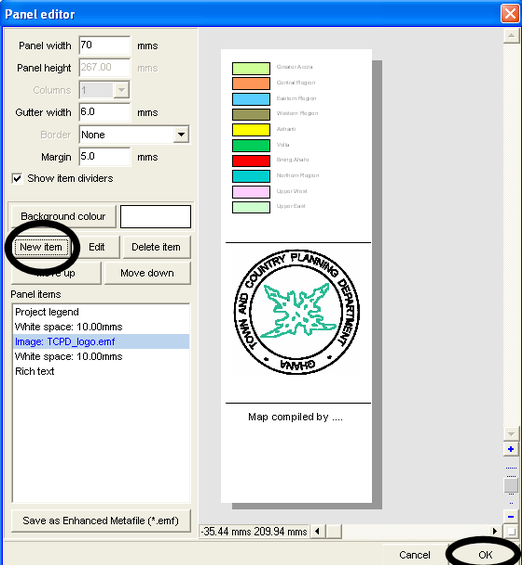
In the panel editor window, you can add legend, images (logo, pictures etc), text, spaces. Close with OK.
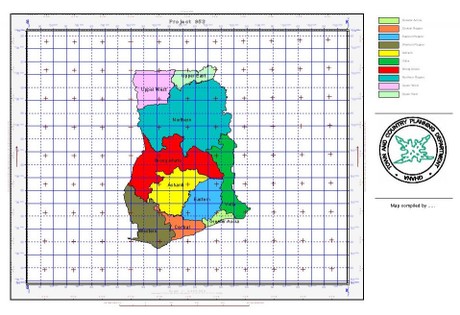
The result can look like this:
The decision about the final map layout has not been made at the Project.
- - - - -
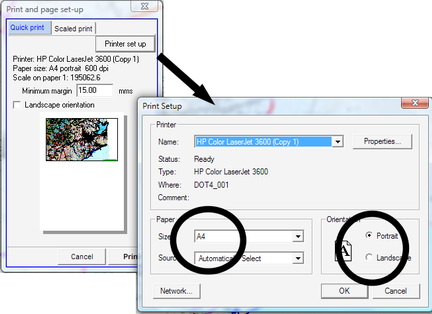
C) You can also print A3 (or larger) maps on standard A4 printer.
As usual, select the printer and its normal (A4) size, either portrait or landscape (Quick print > Printer set up > Print Setup window: Size: A4 > OK):
In the Print and page set-up window, you can select a different size for the map (Sheet size), for example: A3 landscape.
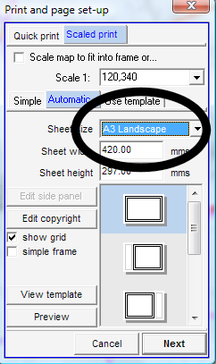
At the display at the Print window, you will see red line(s) crossing the map. These indicate the sheet frame, as it will be printed.
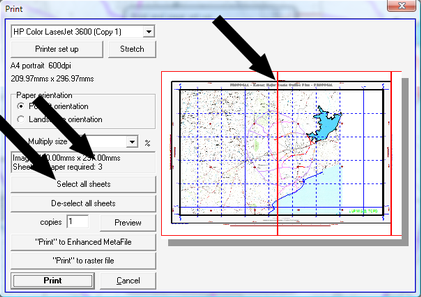
At the end, you have to cut the margin off and stick the individual sheets together by scotch tape.
- - - - -
D) If you print larger sizes (A2-A0), you should use map templates (see Chapters 6.5 and 6.6.5).
Alternatively, you have to adjust sizes of styles and fonts (see Chapter 6.6.5).