6.9 External display of features - LUPMISManual
Main menu:
6.9 External Display of Features
Level of expertise required for this Chapter: Advanced; general Map Maker training
There are various ways to display additional information on-screen - beside the map display (see Chapter 1.2).
6.9.1 Retrieve Database Information
Information of the database (attribute data) can be retrieved either in tabular form, when clicking on the unit, or as a thematic, coloured map. The procedures are explained in Chapter 4.3.
6.9.2 Link to External Documents
It is possible to link an external document, which refers to a geographical unit, and have a specific document displayed, when clicking on the unit. An ‘external document’ can be a Word document, a graphic file, a PDF file or similar, including the possibility to edit the document after being loaded.
For example, when clicking on a parcel, LUPMIS will then show the application form, the permit issued (see Chapter 8.4 for Permit Tools), a photograph or similar.
Currently, it is possible to have following data of the DRA file as references:
id
style
label
The item in the id, style or label field must have an equivalent file name (without extension). For parcel references, the easiest is to have the UPN (see Chapter 7.7.1) as the display label and files with the file name of the UPN.
In the Project manager window: Select the layer (1, see below) > Data link (2) > On-hit (3) > Tick ‘Make layer hit-able’ (4) > Document or link (5) > Link layer (6) > EXE (7) > Change Program > Select folder and file of program (8, see table below for some program examples, others are possible) > Send parameters: Specify path, data field in parentheses (<>) and extension (9, see examples below), all in double quotations) > OK (10)
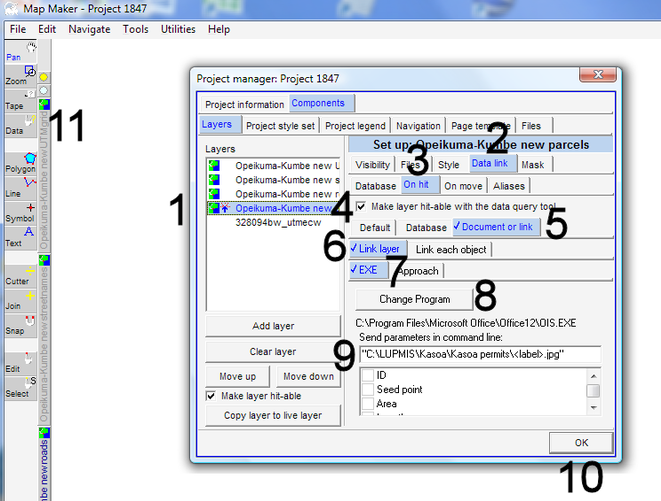
You will have to select the Data-tool on the toolbar left (11) and click on the unit of interest.
Examples of calling programs (step 8):
Program |
Program file |
For display of: |
MS Office Picture Manager |
C:\Program Files\Microsoft Office\Office12\OIS.EXE |
For graphic files: JPG, BMP, TIF etc |
MS Word |
C:\Program Files\Microsoft Office\Office12\WINWORD.EXE |
For Word documents (DOC, DOCX) |
Adobe Acrobat Reader |
C:\Program Files\Adobe\Acrobat 7.0\Reader\AcroRd32.exe |
For PDF documents (PDF) |
MS Excel |
C:\Program Files\Microsoft Office\Office12\EXCEL.EXE |
For Excel spreadsheets (XLS, XLSX) |
Examples of the command line entry (step 9, observe the double quotations):
“C:\LUPMIS\Permits\Kasoa_Permits\<label>.jpg”
“C:\LUPMIS\Permits\Ejisu_Permits\<style>.docx”
“C:\LUPMIS\Temp\<id>.pdf”
The location (path) of the program file might be different due to different installations and operating systems.
After you have set up the link reference, you better save it as a project (Main menu > File > Save project as), because any copying to the live layer or temporary other hit-definitions will delete the original link reference.
See also Annex 17.3 for examples.
- - - - -
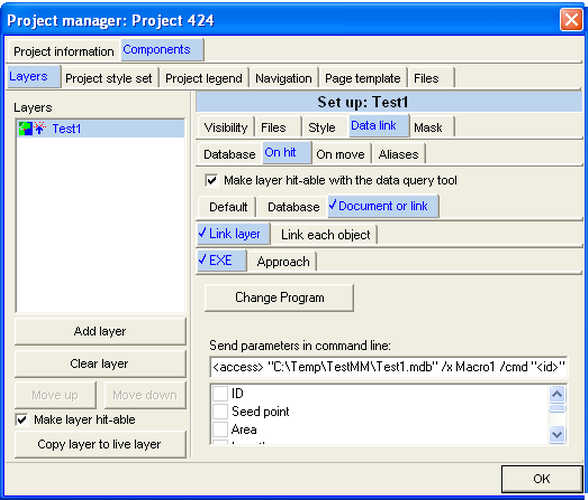
Alternatively, you can call a macro in MS Access, even without the Change Program selection with following syntax:
<access> "Databasefile.mdb" /x Macro1 /cmd "<id>"
For example:
<access> "C:\LUPMIS\Permits\Kasoa_Permits.mdb" /x Macro1 /cmd "<id>"
- - - - -
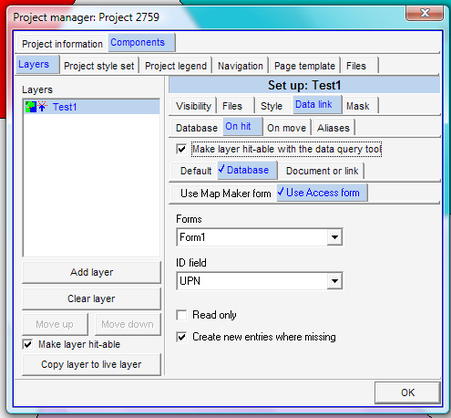
Alternatively, MS Access data can be called through an Access form (active, if an MDB file has been loaded): Project manager > Data link > Database > Choose database > File type: MDB > Select folder and file > Open > Choose Access table window: Select table > OK > On hit > Tick ‘Make layer hit-able’ > Database > Use Access form > Select form > Select id field (reference in form) > OK