6.3.1 Map furniture - LUPMISManual
Main menu:
6.3 Marginalia
6.3.1 ‘Map Furniture’
Level of expertise required for this Chapter: Intermediate; specifically for LUPMIS @ TCPD
In Map Maker map marginalia are called ‘map furniture’. These are all objects on a map, which are not related to a geographical location, but to the layout of the page, such as:
North arrow (should be on all printed maps)

General recommendation: Use a standard, ‘conventional’ north arrow (as shown above), not a new design.
Title (should be on all printed maps)
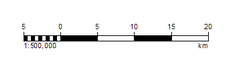
Scale bar (should be on all printed maps)
Copyright and LUPMIS remark (should be on all printed maps)
Legend (see Chapter 6.4, optional)
- Explanatory text (optional)
- Not-site specific graphics, such as pictures, logos etc (optional)
- External document (e.g. Word file, only in exceptional cases)
Location map (overview map, optional),
Detail maps (only in exceptional cases)
… and more….
It does neither include the frame of the map nor the grid (see Chapter 6.3.2).
In most cases, you need the ‘map furniture’ only when printing the map.
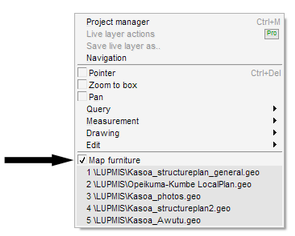
You invoke the ’map furniture’ by right-mouse > Map furniture > (cursor will change to a ‘box’ indicator) > drag from top left corner of the area, where the ‘furniture’ shall be displayed, to the bottom right corner > Map furniture window: Furniture type > Select feature > OK
You can define where these map marginalia are placed on the page by
relating (‘anchor’) it to one of the four corners of the page, and
with a defined distance to this corner.
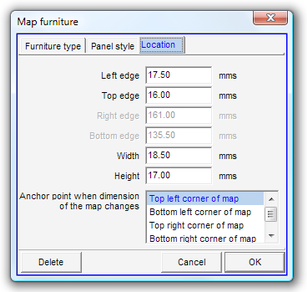
You access this option by: In furniture mode (right-mouse > Map furniture) > click on the furniture (e.g.scale bar) > Map furniture window: Location > Define the distance horizontally and vertically (two of the top four entries) > OK
Whenever you move (‘pan’) or scale, the location of the ‘furniture’ will be the same on screen and on the printed map.
You can resize the ‘furniture’ box by dragging the arrows of the ‘furniture’ box. The arrows will appear when you move the cursor (in 'furniture' mode) from the box (where it appears as a hand) to the outside (where the ‘box’ text appears). 'Between the box and the hand', the arrows appear.
In a similar way, you can change the position of the ‘furniture’ easily by dragging the hand cursor to the new location.
- - - - -
The ‘furniture’ of the LUPMIS reference should be displayed on all printed maps, at the bottom right:
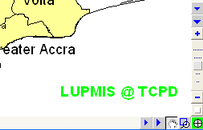
In the very bottom right corner of the display, draw the furniture box: Right-mouse > Map furniture > draw a longish box > Map furniture window: Furniture type > Rich text panel > Type: LUPMIS @ TCPD > Select the text and mark it green, right-aligned, bold and with following size:
For A4: 20
For A3: 24
For A2: 24
For A1: 30
For A0: 30
> Increase the letter L > Map furniture window: Location > Right edge: 0 > Bottom edge: 0 > OK
You might have to re-align the 'furniture box' on the map display, to have the text nicely displayed.
- - - - -
The ‘furniture’ of the TCPD logo should be displayed on all printed maps, at the bottom left:
In the very bottom left corner of the display, draw the furniture box: Right-mouse > Map furniture > draw a squarish box > Map furniture window: Furniture type >Bitmap file (.bmp) > Select folder: C:\Map Maker\Configuration\GraphicSupport > Select file: TCPD_logo.bmp (provided by LUPMP-HQ) > Open > Map furniture window: Location > Left edge: 0 > Bottom edge: 0 > OK
- - - - -
Note: If you change the display scale, the scale bar will be corrected automatically. The difference between the screen scale and the ‘furniture scale’ is, that only the ‘furniture scale’ will be printed.