7.7.1 UPN - LUPMISManual
Main menu:
- 0. Introduction
- 1. GIS handling
-
2. GIS data entry
- 2.1 Create new layer
- 2.2 Digitize line
- 2.3 Digitize point
- 2.4 Digitize polygon
- 2.5 Edit existing layer
- 2.6 Delete feature
- 2.7 Split line
- 2.8 Split polygon
- 2.9 Merge lines from different layers
- 2.10 Unite lines
- 2.11 Snap lines
- 2.12 Join polygons
- 2.13 Extend polygon
- 2.14 Insert island
- 2.15 Define unit surrounding islands
- 2.16 Create 'doughnut'
- 2.17 Fill 'doughnut' polygon
- 2.18 Fill polygon with 'holes'
- 2.19 Digitize parcels from sector layout
-
3. GIS operations
- 3.1 Create buffer
- 3.2 Create exclusion zone
- 3.3 Overlay units
- 3.4 Convert line to polygon
- 3.5 Derive statistics (area size, length)
- 3.6 Clip unit according to other unit
- 3.7 Create geographic grid
- 3.8 Move entire vector map
- 3.9 Move or copy individual features on a map
- 3.10 Adjust polygon to line
- 3.11 Convert points to polygon
- 3.12 Define by distance
- 3.13 Create multiple objects
- 3.14 Transfer styles from one layer to another
-
4. Attribute database
- 4.1 Start with database
- 4.2 Import database
- 4.3 Display database information
- 4.4 Enter attribute data
- 4.5 Attribute matrix of multiple layers
- 4.6 Seeds
- 4.7 Repair attribute data
- 4.8 Merge lines with attached database
- 4.9 Transfer attribute data from points to polygons
- 4.10 Copy styles, labels, attributes
-
5. Conversion of data
-
5.1 Points
- 5.1.1 Import list of points from text file
- 5.1.2 Import list of points from Excel file
- 5.1.3 Convert point coordinates between projections
- 5.1.4 Convert point coordinates from Ghana War Office (feet)
- 5.1.5 Convert point coordinates from Ghana Clark 1880 (feet)
- 5.1.6 Track with GPS
- 5.1.7 Download GPS track from Garmin
- 5.1.8 Download GPS track from PDA
- 5.1.9 Frequency analysis of points
- 5.2 Vector maps
- 5.3 Raster maps
-
5.4 Communication with other GIS programs
- 5.4.1 Import GIS data from SHP format
- 5.4.2 Import GIS data from E00 format
- 5.4.3 Import GIS data from AutoCAD
- 5.4.4 Export LUPMIS data to other programs
- 5.4.5 Export GIS to AutoCAD
- 5.4.6 Change a shape file to GPX
- 5.4.7 Transfer GIS data to other LUPMIS installations
- 5.4.8 Digitize lines in Google Earth
- 5.5 Terrain data
- 5.6 Export to tables
- 5.7 Density map
-
5.1 Points
-
6. Presentation
- 6.1 Labels
- 6.2 Styles and Symbols
- 6.3 Marginalia
- 6.4 Legend
- 6.5 Map template
- 6.6 Final print
- 6.7 Print to file
- 6.8 3D visualization
- 6.9 External display of features
- 6.10 Google
-
7. GIS for land use planning
- 7.1 Introduction to land use planning
- 7.2 Land use mapping for Structure Plan
- 7.3 Detail mapping for Local Plan
- 7.4 Framework
- 7.5 Structure Plan
- 7.6 Local Plan
- 7.7 Follow-up plans from Local Plan
- 7.8 Land evaluation
-
8. LUPMIS Tools
- 8.1 General
-
8.2 Drawing Tools
- 8.2.1 Overview
- 8.2.2 UPN
- 8.2.3 Streetname + housenumbers
- 8.2.4 Lines
- 8.2.5 Arcs
- 8.2.6 Polygons
- 8.2.7 Points
- 8.2.8 Cut line
- 8.2.9 Other Drawing Tools
- 8.2.10 Import
- 8.2.11 Projections + conversions
- 8.2.12 Format conversion
- 8.2.13 Other GIS Tools
- 8.2.14 Utilities
- 8.3 Printing Tools
- 8.4 Permit Tools
- 8.5 Census Tools
-
8.6 Revenue Tools
- 8.6.1 Overview
- 8.6.2 Entry of revenue data
- 8.6.3 Retrieval of revenue data
- 8.6.4 Revenue maps
- 8.6.5 Other revenue tools
- 8.7 Reports Tools
- 8.8 Project Tools
- 8.9 Settings
-
9. Databases
- 9.1 Permit Database
-
9.2 Plans
- 9.2.1 Accra
- 9.2.2 Kasoa
- 9.2.3 Dodowa
- 9.2.4 Sekondi-Takoradi
-
9.3 Census Database
-
9.4 Revenue Database
-
9.5 Report Database
-
9.6 Project Database
- 9.7 Address Database
-
Annexes 1-10
- A1. LUPMIS setup
- A2. Background to cartography/raster images
- A3. Glosssary
- A4. Troubleshooting
- A5. Styles
- A6. Classification for landuse mapping/planning
- A7. GIS utilities
- A8. Map projection parameters
- A9. Regions / Districts
- A 10. Standards
-
Annexes 11-20
- A11. LUPMIS distribution
- A12. Garmin GPS
- A13. Training
- A14. ArcView
- A15. Population statistics
- A16. Entry and display of survey data
- A17. External exercises
- A18. Programming
- A19. Paper sizes
- A20. Various IT advices
- A21. Site map and references
7.7 Follow-Up Plans from Local Plan
Level of expertise required for this Chapter: Planner; specifically for LUPMIS @ TCPD
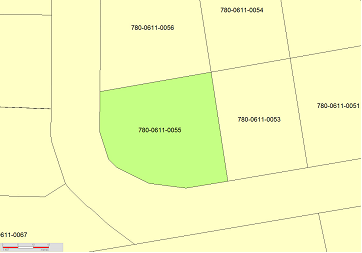
7.7.1 UPN
See separate Chapter 8.2.2a for the UPN concept.
The Unique Parcel Numbering system (UPN) serves as the main identifier for the Permit Database (see Chapter 9.1). They are unique all over Ghana and follow a rigid structure to serve as a code for each parcel in Ghana to be processed by all Land Sector agencies of the Government of Ghana.
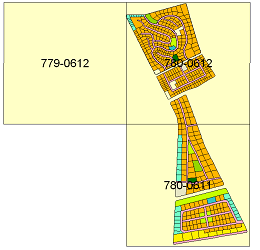
Ssyntax of UPN is xxx-yyyy-nnnn, where:
xxx is the 3-digit Easting of the 1km-UTM-grid cell, where the parcel is situated (reference point is the bottom left corner of the km-grid cell),
yyyy is the 4-digit Northing of the grid cell,
nnnn is the given number of the parcel within this cell, given by the District Planning Committee(s) of the District Assembly/ies, often sequentially numbered.
Further documentation can be found in the report ‘Unique Parcel Numbering (UPN) System for Ghana’ (UPN Technical Committeee, MLFM, June 2008). Benefits, approach and syntax are explained in this report, also the reference to serve further functionalities: ‘The UPN system will serve as a database for any additional numbering or coding system, which will be established in future, such as postal addresses, geo-coding databases’.
A) Automatic Process:
It is strongly recommended, to use the most efficient and reliable way to assign UPN to all parcels of a Local Plan automatically with the LUPMIS 'UPN assignment' Drawing Tool, explained in Chapter 8.2.8. This will assign the UPN to the ID of the GIS DRA file.
B) Manual Process:
1. Be aware, which and how many UTM-grid cells are in your area. You can use the Main menu > Navigate > Screen grid > 1 km option to see or Main menu > Utilities > Vector utilities > Generate > Square cells to create a grid layer (See also Chapter 3.7 for the procedure to create a layer of a geographic grid).
2. Only if you do not have valuable information in your display label in your GIS file: You can label each cell with its UTM coordinates: In live layer mode: Right-mouse > Live layer actions > IDs and labels > Generate Display labels based on coordinate > Kilometre resolution > Separator: - > OK
3. Again, only if you do not have valuable information in your display label in your GIS file: Select all parcels of one cell and assign first part of the UPN to all parcels, which are within the same grid:
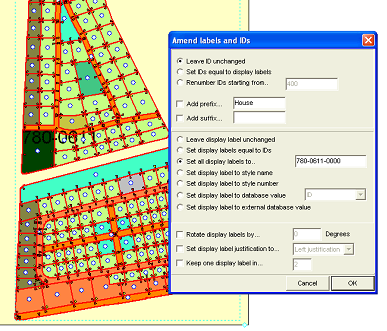
With the parcel layer in live layer mode: Main menu > Edit > Show selection manager > Select-tool (at toolbar left) > Select all parcels of one cell > Selection Manager window: Actions > IDs and labels > Amend labels and IDs > Amend labels and IDs window: Set all display labels to … > and enter the code of the cell (here 781-0612), preferably with a trailing ‘-0000’ > OK
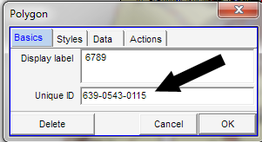
4. The second part of assigning numbers to each parcel has to be done manually. Consecutive (sequential) numbers have to be assigned, starting from 0001, then 0002, etc.
Still in live layer mode: With the Edit-tool (at toolbar left) click on the parcel > Polygon window: Display > Adjust the last digits of the display label > OK
 or (later)
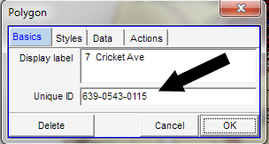
5. Don’t forget to save.
- - - - -
It is possible to create a link to an external document (Word file, graphics file or similar), which pops up when clicking on a parcel (for example, the specific application form, a permit which has been issued etc). The 'link' is to be through the UPN.